Gravity Forms is one of the most popular Advance form builder for WordPress. It comes with various Payment Gateway integration Support and Stripe is one of them. Here we discuss how to connect Gravity form with Stripe.
Pre-Requisites
- Gravity Forms and Gravity Forms Stripe Add-On installed
- SSL Certificate Installed and Configured
- A Stripe account
- A Stripe account login with user role of “owner” or “administrator”
- Your Site must serve over HTTPS
Stripe Add-on Settings in your Site
The Stripe Settings will allow you to connect and authenticate with your Stripe account and make some choices about how you collect payment information. Additionally, it will allow you to setup webhooks which are used to communicate events from Stripe back to your Gravity Forms environment.
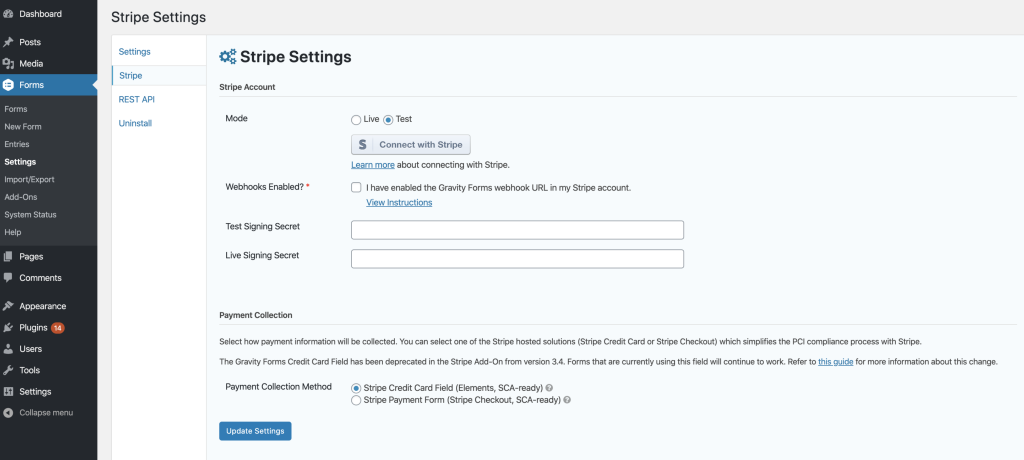
Navigate to your Stripe Add-On Settings page:
- Log into your WordPress admin dashboard.
- On the left side navigation menu, hover over Forms and click on Settings.
- Click the Stripe tab.

- Mode Allows you to specify the environment you want to send your form submission to. Choosing Live will initiate real transactions, while Test will run the form entry into your Stripe test environment, which should not generate any real transactions.
- Click on view instruction link in Webhooks Enabled?* checkbox and copy the url shown there. We need it to later while setting up for connecting Stripe.
Creating Webhook in Stripe
- Login to your Stripe Account
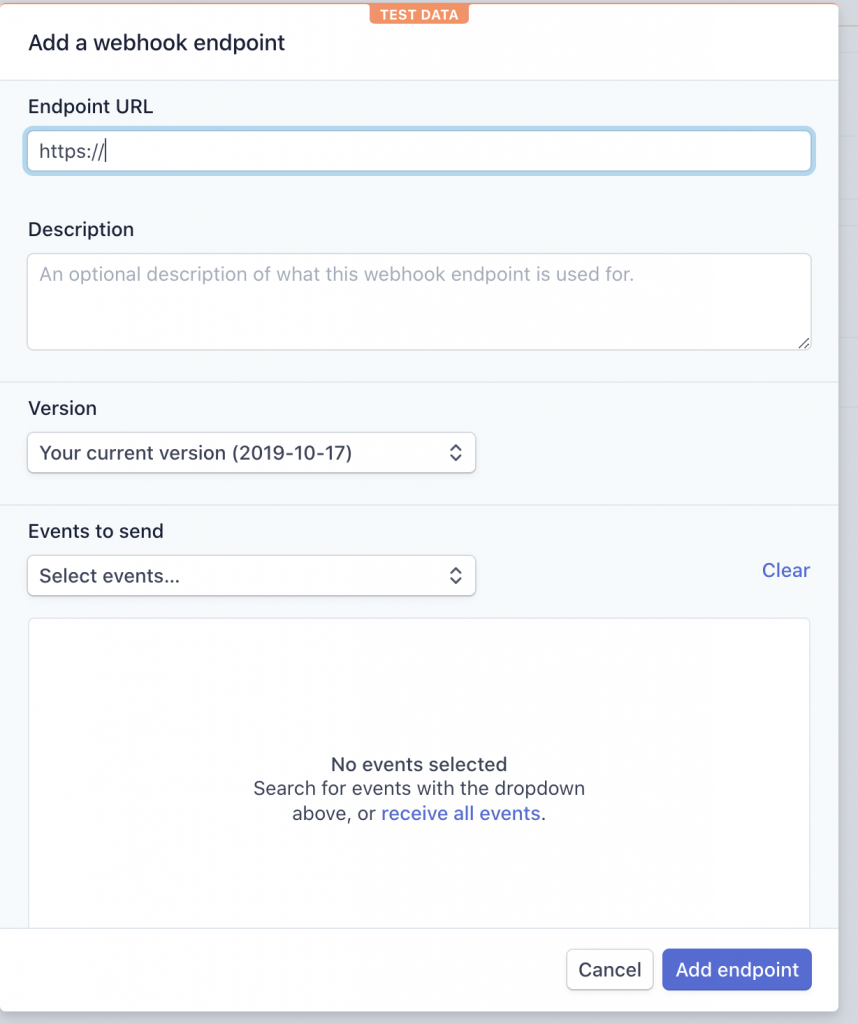
- Go to WebHook Page and click Add endpoint button. A popup will open as follows. The Test Data badge is showing because I am using test mode.

- Paste the copied url at step 2 of section
Stripe Add-on Settingsin Endpoint URL text box. - Add Description
- If offered the choice, select the latest API version.
- Click the receive all events link.
- Click the Add Endpoint button to save the webhook.
- Copy the signing secret of the newly created webhook on Stripe in the screenshot
- Save the settings

Authenticating With Stripe
- Paste the signing secret in the Signing Secret Textbox for appropriate mode
- Tick the Webhooks Enabled? * checkbox
- Just click the Connect With Stripe button shown in the Forms > Settings > Stripe page. It will redirect you to Stripe Authorization page
- Use the Switch Account drop down menu to select the Stripe account you wish to connect to.
- Fill out the form and click the “Authorize access to this account” button. Alternatively, if you are using Stripe in development mode, you can click the “Skip this account form” link at the top of the page.
- You will be returned to the Stripe Settings page. You should see “Connected to Stripe as” with your account name as well as a “Disconnect” button.

Setting Up a Stripe Compatible Form
- From the left-hand navigation menu of your WordPress admin dashboard, hover over Forms and click on New Form.
- Enter a Form Title and Form Description. Click Create Form. Alternatively you can hover over Forms and click on Forms to choose an existing form from the list.
- Add fields for capturing standard payment information. We included the Name, Address, and Email fields to get basic information from customers. Note: If you would like to receive receipts for Stripe transactions, be sure to add the Email Field.
- Add a Product field and customize it according to your need
- Go to Settings > Stripe of that particular form and add your subscription
Hurray you are done with the integration 😀


